What is a photogram/Rayograph
A photogram or a rayograph is a photo taken without a camera.
they are made by placing objects on a photographic paper and exposing them to light. When the object is on the photographic paper its blocking the light and will leave a pale whit or grey colour where the light hasn't reached the surface. If the light can reach underneath the object then it will turn a lighter tone. Also if the paper isn't protected at all then the paper will turn black.
How to make a photogram
Firstly, we chose any object from our bag which we think would be a would be a good experiment for the enlarger with the red light which is a safe light in the dark room. we then got into small groups to go through the dark room door, eventually we then got in there and switched the light of and switched the red light on , Mrs Minnicucci then took out a piece of half A4 sized piece of cardboard called photographic paper using the shiny side facing upwards and she told us how objects on his will not be shown if its exposed to daylight. We then got their objects including myself and placed them on the shiny piece of photographic paper underneath the enlarger. Mrs Minnicucci pushed the button on the enlarger for less than a second, we then moved the objects and got the piece of photographic paper and put it into three liquids called developer, stop and fix, leaving it in each for sixty seconds. We then allowed it to dry. as it dried we then noticed items such as scissors and earphones were the best objects for the red-light underneath the enlarger because they were not transparent which then made the picture more presentable to see.
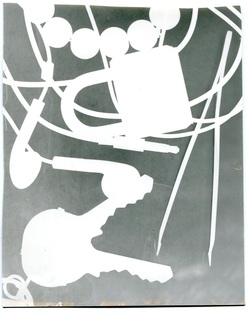
Experiment 1
My first photogram experiment wasn't very successful because the objects we placed on the photographic paper were not exposed to the light for long enough. This is because the contrast wasn't very good because the black is very grey and the white is also grey. The composition wasn't how i wanted it.
My first photogram experiment wasn't very successful because the objects we placed on the photographic paper were not exposed to the light for long enough. This is because the contrast wasn't very good because the black is very grey and the white is also grey. The composition wasn't how i wanted it.

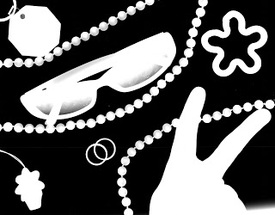
Experiment 2
My second experiment was more successful because the contrast was improved because there is a bigger range of black and white, this is because I allowed the photographic paper to be exposed for longer. The composition was arranged more creatively there wasn't as much space, so the photographic paper looked more filled.
My second experiment was more successful because the contrast was improved because there is a bigger range of black and white, this is because I allowed the photographic paper to be exposed for longer. The composition was arranged more creatively there wasn't as much space, so the photographic paper looked more filled.
